Saturday 28 December 2013

Rimmel Stay Blushed! Liquid Cheek Tint in 'Pop of Pink' [Review]

Dear readers,

Wishing you all happy holidays!

I know I've slacked a bit from blogging but I'm doing a Masters degree in English plus working and taking care of the house [chores etc] and I've no time left for myself. I'm leading a non existing life at the moment - I'm stuck in this boring routine which is making time pass so quickly I just can'f get a grip. 

If I'm not working I'm at university. By the time I'm back home I only feel like lounging about the house in a zombified state. 

Anyway.

Enough moping.

I've had this Rimmel Stay Blushed Liquid Cheek Tint for about three months now. To be completely honest I forget I have this because Benefit's Benetint is my go to blusher/cheek tint.

I got this from Boots when I was in the Uk.

Comes in a small, squeezy toothpaste-like tube and you get 14ml worth of blusher. 

The pinkness of the blusher is really similar to the pink of the packaging - it is a kind of bubblegum/antique/dusty rose kind of mix. Upon close inspection it does have slight shimmer in it which does not transfer on my cheeks [or I just can't see it].

It does give you a couple of seconds until you blend it before it sets. It gives a nice, natural rosy flush which I love in Winter and the colder months.

This lasts about 3-4 hours but I do find that blushers don't have great lasting power on me [except Benetint which stains like crazy].

I would recommend this for those ladies who would like to try out a cream based blush who would like to get a natural flush [and without the risk of overdoing it]


Love,

Lorraine
xoxo

Friday 13 December 2013

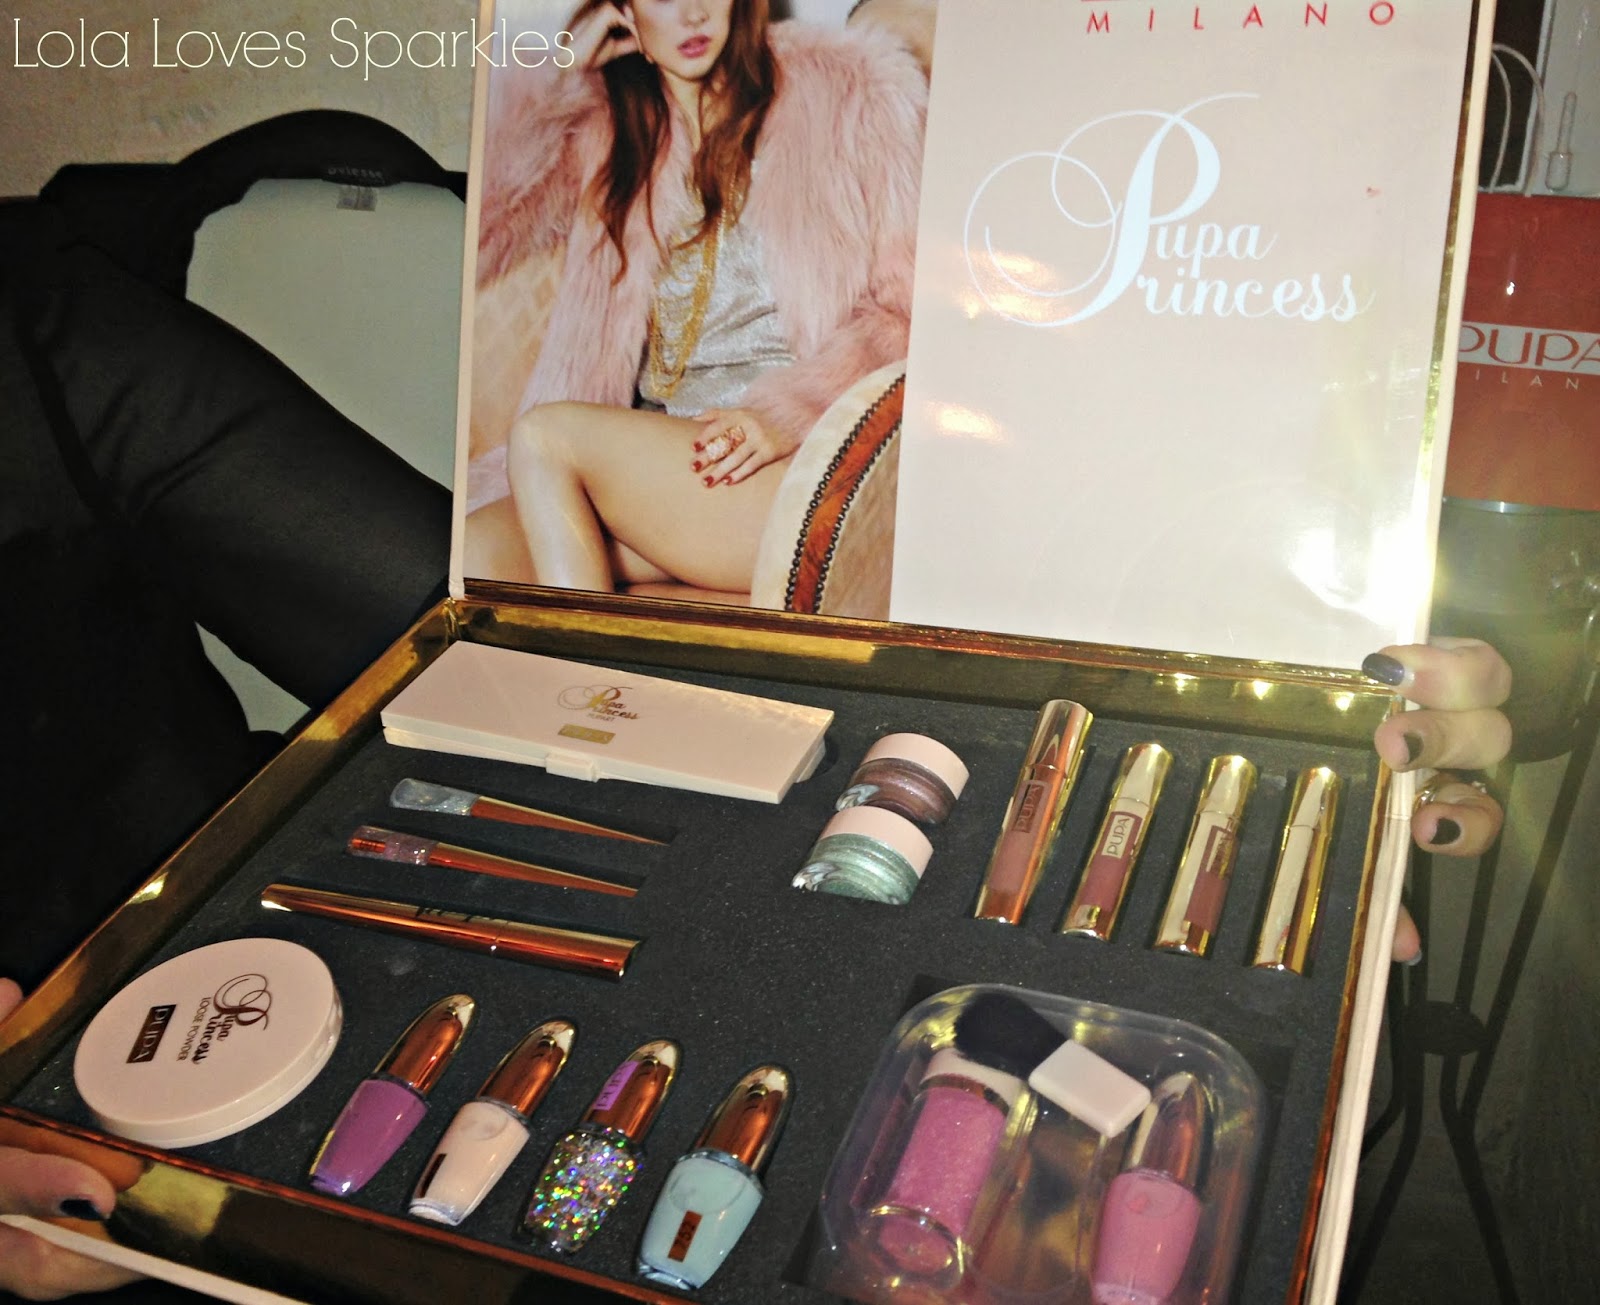
Pupa Milano Princess Collection [Limited Edition]

Dear readers,


Earlier this month, myself and a number of fellow bloggers where invited to a private viewing of the new limited edition collection by Pupa Milano - the Princess Collection. The shades in the collection are all soft and romantic, which makes this collection a must have since light, rosy colours have been all the rage recently.

You can choose from nail polishes [Lasting Colour] to lip glosses and even a fluffy nail art kit! Prices retail from as little as €5.60 for the Lasting Colour polishes to €19.50 for the gorgeous Eyeshadow  Palette, making Pupa products accessible to everyone.

I'll post a couple of reviews for some of the products from this collection which I am really loving in the coming days.


We were also introduced to Pupa's latest nail kits which are aptly called Party Queen, because oh boy, your nails will surely be the life and soul of the party! As with Pupa's other nail kits, with the Party Queen you get a base colour and a small container with large 'confetti' style glitter. They are available in 4 shades and they retail for €13.50. I really can't wait till I get my hands on these and I just know that they'll go down a treat for the Xmas holidays.


Pupa Milano are most famous for their gorgeous looking makeup palettes and sets, and this year they have truly outshone themselves, launching a collection which varies from cute looking dolls, to a fully mechanical working carillon palette;


I well and truly enjoyed the night, the great company and the yummy food - all courtesy of the ever so gracious Stephanie from Medimports.


All Pupa Milano products in Malta can be found in a number of selected pharmacies and stores all over Malta and Gozo. Do let me know if you would like more info and/or prices!

Much love,

Lorraine
xoxo

Tuesday 26 November 2013

Sleek Makeup Blush by 3 in 'Pink Sprint' [Review]

Dear readers,

I've always wanted to try Sleek Makeup, and the first thing which I got was the Blush by 3 in 'Pink Sprint'. I chose to buy a blush palette over a lipstick or say, an eyeshadow palette only because I find that blushers really do not have any staying power on me [with the exception of Benefit's Benetint which I just love!] and I think that I look really pasty without a healthy flush.

I got mine from Superdrug but you can get yours from the Sleek website by following this link *here*. They ships to a number of countries including Malta =^.^=

This costs €12.99 from the website.

It comes in a standard hinged palette with a good sized mirror on the inside. 

You get 3 shades: a gorgeous cranberry colour, a brightish pink and a dark dusty rose.

The shades in this palette are not for the faint hearted because they are loud and very much pigmented, but if you use a light hand [and it's better to use a light hand when applying loud colours] these really do work and they do give you a very nice rosy flush - which I love for the winter-y season.

These last about 4-5 hours on me which I think it's normal for a powder blush [on me anyways]


Love,

Lorraine
xoxo

Sunday 10 November 2013

MAC Viva Glam 1 [Review]

Dear readers,

I love Autumn and Winter because it means that I can wear loads of red lipsticks [and darker colours too]. The latest red lipstick to join my collection is MAC's Viva Glam 1.

When I ventured to the MAC store this was the last shade on my mind, since I wanted to get a couple of shades from the Retro Collection - but the ones I wanted were sold out. One of the girls there asked me if I had this shade because she thought that my olive skin would work really well with the shade of Viva Glam 1, so I got it.

As most of you know, all the money that is made from this lipstick (and all the Viva Glam shades) go towards the MAC Aids Fund to help men, women and children who are suffering from the condition.

And did you know that apparently this shade has been around since 1994?

Viva Glam 1 is a deep, red matte lipstick with excellent pigmentation and lasts for hours and hours. Although it is matte, is is not drying on the lips - although I always prep my lips with a scrub and a lipbalm before I apply any kind of lipstick [especially matte ones].

If you would like a classic MAC red lipstick but think that Ruby Woo or Russian Red are too bright for you, you should definitely try Viva Glam 1 out.

I also think that this would suit nearly (if not) all skin tones.


Love,

Lorraine
xoxo

Sunday 3 November 2013

MUA Matte Palette [Review]

Dear readers,

I hope you're all having an enjoyable Sunday! I am spending mine lazying in bed watching Vampire Diaries [and yes, I am totally hooked!], then tonight I'm off to to watch a play.

Back when I was in the UK about a month or so ago now I got the Ever After Matte Palette by MUA [Make Up Academy] because I really wanted to try it out after I read some reviews about it [and I prefer using mattes rather than frosty or shimmery eyeshadows for Autumn]

I got this for £4 from Superdrug but you can get yours from the MUA website *here*

The palette comes in MUA's standard black plastic packaging with a transparent lid. Unlike some of their other palettes, the eyeshadow pans in this one are square (rather than round) and so hold more product.

You get a rather extensive choice of matte shades - from the lightest ivory u the darkest brown colour. I do think that some of the lightest shades look very similar to each other though.

Like the rest of the matte colours from MUA's other palettes, these are not that greatly pigmented - some of them require more than one swipe to achieve good colour payoff.

Having said that, I use this palette in combination with UD's Naked Basics because I love the darkest brown shades in MUA's palette. 

They do blend quite well although I wished they would have been a tad more creamier. 

Still, you can use this palette for a different number of looks - from daylight to a smokier one.

I do believe that this palette is quite a steal at £4 and would definitely recommend it to those persons who would love to try out a couple of matte eye shadows without breaking the bank (especially students etc)


Love,

Lola
xoxo


Tuesday 29 October 2013

5 Easy Make Up Tips


Dear readers,

Today I wanted to share with you some tips which I've picked throughout the years. I'm sure that most (if not all) have read about these before, but I just wanted to put my 2 cents worth in a blog post (so bear with me);

Always use moisturiser before applying foundation:
Yes! Even if your face is oily, you do need to apply a good moisturiser as a base before you apply anything at all on your face - this will give you a flawless finish (especially if you apply your foundation with a brush). If anything, apply foundation than blot some away with a tissue.

Chiaroscuro: 
The importance of light and shade! Think about this - when you apply your foundation you "wipe" away all the natural shading and contouring - so you must remember that contouring and highlighting can make a world of a difference (taking you from 2 dimensional to 3D). Apply a darker contouring powder on the hollows of your cheeks, along your jawline, temples and on the sides of your nose to make it look narrower or pointier - anything you fancy really! Apply highlighter on the bridge of your nose, on the corners of your eyes and my favourite - on your cupid's bow for a plumper, fuller look.

Wiggle your wand:
I must admit that I have been blessed with long lashes - but correct mascara application is important too. To achieve fuller looking lashes, wiggle your mascara wand at the base/roots of your lashes to the tips. This will make your lashes appear fuller without the need to apply false eyelashes. And if you have mascara which is older than 2-3 months - throw it away! Also use a liquid or pen eyeliner to draw a thin line along the roots of your lashes.

Be creative:
There's no need to have a large makeup bag full of items which you won't use (although I am guilty of doing so). Many makeup items can be used in different ways: use a pink or red lipstick as a cream/natural looking blusher - just dab onto your cheeks and blend really well - and voila! a gorgeous rosy flush. Mascara can double up as eyeliner - just dip a tiny brush into your mascara tube and line your eyes as normal. A brown eyeshadow can be used as a contouring powder. A frosty white eyeshadow can be used as a highlighter. Really, anything has multiple uses!


Vaseline is your best friend:

Use it to remove waterproof makeup, as a makeshift lipbalm and/or scrub or to groom your eyebrows, Vaseline is a sure must have in your makeup bag. It is cheap and can be used in loads of different ways.


Hope you found some of these tips useful!

Love,

Lorraine
xoxo


Sunday 20 October 2013

E.l.f Studio Blush in 'Tickled Pink' [Review]

Dear readers,

A couple of months ago I ordered some item from Elf - they had some kind of offer going on ... and I thought why not?

I got the E.l.f Studio Blush because I'd heard so many great things from the beauty world about this line of blushers. I chose the shade 'Tickled Pink' since I wanted a 'natural' looking blush.

This cost me £3.75.

Packaging is ok - I actually quite like it. It is compact, sturdy and has a mirror inside.

I was very looking forward to try this blusher out, but when I swatched it for the first time I was completely and utterly disappointed.

The shade is a very light, peachy shade. It is not powdery, but it is not too pigmented either. To me this shade looks more like a highlighting shade than an actual blusher. It does not show on my olive skin tone - this would work best for really pale skin.

You have to really build this up since it is so sheer - and to be honest I'm not really bothered most of the time.

This blusher has found its place at the back of my drawer, never to see the light of day again.

Have you ever tried any blushes from this line? Are they any good, or is it just this shade (or me)?


how light it is >.<
Much love,

Lorraine
xoxo

Saturday 19 October 2013

Rimmel Stay Matte Liquid Mousse Foundation [First Impressions | Review]

Dear readers,

Even though I am a sucker for BB creams, I do love to buy new foundations every now and again, even though it is a challenge to find one which I truly like.

When I was on holiday in the UK I bought the new foundation from Rimmel [launched in September], the Stay Matte Liquid Mousse Foundation, from Boots, along with a cream blusher ... but more on that in a later post.

The shade I chose is #100 'Ivory' [I believe that there are 6 shades in all]

First of all let me start by saying that I have been using this foundation on a daily basis, ever since I got this [about 3+ weeks or so now].

The first time I swatched this I was completely amazed because this feels just like mousse, but out of a tube. Therefore, it feels ultra velvety on the skin, and it blends really easily - especially with your fingers.

It gives a soft, matte [kind of powdery] finish with medium coverage. So if you're lucky enough to not have oily skin, you can actually go without setting this with powder.Since its consistency is quite thick, you only need to dab small amounts to cover your whole face.

This lasts the better part of a day on me, but since the weather here is so hot and humid [it's still around 30 degrees celcius] I do sometimes pair this with primer.

I would definitely re-purchase this.


Definitely applied too much here


blended

Love,

Lorraine
xoxo


Friday 11 October 2013

UK Accessories Haul

Dear readers,

I thought it was about time that I uploaded what accessories I got from my trip to the UK. As you may notice, 99% of the things I got were from Primark (how can you resist those prices?!)

My favourite buys are the midi rings which I am utterly head over heals in love and obsessed with at the moment. I think they make your fingers look so feminine and pretty! What do you think? Yay or nay?

I also got some silicone hair bands (I always seem to lose mine, bah!), hair clips (excellent for parting your hair) and a backcombing brush - which I'm sure I will use a lot during the coming months (even though it's not really healthy for your hair - but I'm quite the rebel you see, he he).

So tell me, which is your favourite piece? Which would you buy for yourself?


Hugs,
Lola
xoxo


Saturday 5 October 2013

Dream Catcher with Feathers Nail Art [Step by Step | Tutorial]


Dear readers,

I had been wanting to try out a dream catcher design for the longest time ever, and finally today a sweet client/friend of mine [Hi Charlene!] let me try out this design on her nails. 

I decided to do a step-by-step tutorial as soon as she gave me the go-ahead, and I must say that they turned out way cute, if I say so myself!

You can do this design in a variety of colours, but it must be on the light/pastel side since you do need for the black to show up real well on the base colour.

We chose this green/pistacchio colour by Sinful Colours as a base, but it can be done using yellow, pink, blue or any other colour you fancy.

I also used Bundle Monster nail plates which I got off Amazon - get yours from this link *here* - I love them and they're so affordable too! Only $17.99 and you get 21 nail plates. I used black Konad polish with them though.

What you need are the following;


  • 1 light base colour
  • 3 contrasting colours for the beads on the dream catcher
  • 1 black nail striper [or black nail polish and a thin paintbrush or toothpick]
  • a dotting tool 
  • feather stamp or you can draw the feathers free hand
  • topcoat 

This is the finished result:


To start with, apply two coats of the base colour of your choice;


*Client has acrylic nails*


Decide on which nails you want the dream catcher design - we went with the ring and thumb nails. Then using the striper brush, draw a semi circle which should span half of your nail like so;


Then, using the striper, place a tiny dot of polish on the centre of the circle you just drew, and draw petal shapes from this centre to the diameter of the larger circle you did. 

Draw small lines in the middle of each 'petal' you just did too.

When you're done, draw 3 vertical lines [2 shorter ones on the side, and 1 longer line in the middle]


Using a dotting tool and contrasting colours, draw on the 'beads' of the dream catcher. I used white, pink, yellow and dark green.

I also used a nail plate by Bundle Monster to stamp on feather designs on the remaining nails. I did this haphazardly to give the feathers a 'flying' effect;


And that's it! Seal your design with topcoat and admire your handiwork :)

This is my final result:


And items I used;


Hope you enjoyed this design, and do let me know if you try it out for yourselves! You can also opt out from the feathers and just do the dream catcher. Anything you like, really.

Let me know if you love/like this design!

Much love,
Lorraine
xoxo